Laravel で admin / user のMulti-Auth を素早く作成する
管理者側テーブル「admin」を利用した認証とユーザー側テーブル「users」を利用した認証を作成する
「素早く」がテーマなので composer パッケージを利用します。
「Laravelアプリの作成」「DB接続設定」は設定完了しているものとします。
● Hesto/multi-auth
https://github.com/Hesto/multi-auth
・パッケージのインストール
composer require hesto/multi-auth
Laravel 6 , 7の場合は次のパッケージもインストールします
composer require laravel/helpers
Laravel 8 , 9 の場合は次のパッケージもインストールします
composer require laravel/ui
・認証ファイルのインストール(小文字、単数形で命名します)
php artisan multi-auth:install admin -f
php artisan multi-auth:install user -f
・管理者アカウントをシーダーに登録する
database/seeders/DatabaseSeeder.php
    public function run()
    {
        // この行を追加 ↓
        $this->call(AdminsSeeder::class);
    }
database/seeders/AdminsSeeder.php を新規作成
<?php

namespace Database\Seeders;

use Illuminate\Database\Seeder;
use Illuminate\Support\Facades\DB;
use Illuminate\Support\Facades\Hash;

class AdminsSeeder extends Seeder
{
  public function run()
  {
    DB::table("admins")->insert([
      'name'                => 'YOUR-NAME',
      'email'               => 'YOUR-EMAIL',
      'password'            => Hash::make('YOUR-PASSWORD'),
    ]);
  }
}
・DBの作成
composer dump-autoload
php artisan migrate
php artisan db:seed
・Laravel8 以降の場合は routes/web.php を書き換える
例
Route::get('/login', 'UserAuth\LoginController@showLoginForm')->name('login');
↓
use Illuminate\Support\Facades\Route;

Route::get('/login', [App\Http\Controllers\UserAuth\LoginController::class, 'showLoginForm'])->name('login');
以上です。 (composer dump-autoload は必ず実行しましょう。クラスが not found になってしまう可能性があります。)
・早速使う
管理者ログイン
http://YOUR-SITE.TLD/admin/login
ユーザーログイン
http://YOUR-SITE.TLD/user/login
・Bladeでの認証記述方法
Bladeテンプレートで adminまたはuserでログインしているかどうかを判別する
@if ( Auth::guard('admin')->check() )
<h1>adminとしてログイン済みです</h1>
@endif
@if ( Auth::guest() )
<h1>管理者ログイン前のguestです</h1>
@endif
・Bladeテンプレートでログイン後のユーザー名を表示する
user の場合
{{ Auth::guard('user')->user()->name }}
admin の場合
{{ Auth::guard('admin')->user()->name }}
・ コントローラーでログイン済ユーザを取得する
use \Illuminate\Support\Facades\Auth;

$loginUser = Auth::user();
・コントローラでログイン後のユーザー名を表示する
dump( \Illuminate\Support\Facades\Auth::guard('user')->user()->name );
・コントローラでユーザーを強制ログアウトさせる
// 強制ログアウト
Auth::guard('user')->logout();
・コントローラでユーザーがログインしているかどうかをリダイレクトさせずにチェックする
if ( Auth::guard('admin')->check() ){
    // ..................
}
・管理者から「ある特定のユーザー」をログインさせる(認証なしで)
// 特定のユーザーでログインさせる(後ろに true をつけると自動ログイン(ログインを記憶)となります。)
\Auth::login($user, true);
● コントローラで認証チェックを使用する
app/Http/Kernel.php には以下のような記述が増えています
    protected $routeMiddleware = [
        'user' => \App\Http\Middleware\RedirectIfNotUser::class,
        'user.guest' => \App\Http\Middleware\RedirectIfUser::class,
        'admin' => \App\Http\Middleware\RedirectIfNotAdmin::class,
        'admin.guest' => \App\Http\Middleware\RedirectIfAdmin::class,
........
なのでこれを使用しましょう。
コントローラのコンストラクタに以下のように記述します
	function __construct(){
		// admin ログイン認証
		$this->middleware('admin');
	}
● ルーターで認証チェックを使用する
routes/web.php に次のように 'middleware' => 'admin' ,'as' => 'admin.' を追加します
// ● admin ログインが必要なページ
Route::group(['prefix' => 'admin', 'middleware' => 'admin' ,'as' => 'admin.' ], function () {
            Route::get("articles/index", "ArticleController@index")->name("articles.index");
});
routes/admin.php に記述する場合は次のようにします。
合わせて app/Providers/RouteServiceProvider.php もチェックしておきます。
// ● admin ログインが必要なページ
// check app/Providers/RouteServiceProvider.php
//
Route::group(['namespace' => 'Admin'], function () {
  Route::resource("posts","PostController");
});
● 管理者、ユーザー毎にログアウトした時のリダイレクト先を設定する
ログアウトした時のリダイレクト先はコントローラーで設定します
管理者用、ユーザー用のAuthコントローラーは
/app/Http/Controllers/AdminAuth/LoginController.php
/app/Http/Controllers/UserAuth/LoginController.php
にあるので、ここに記述します。
( vendor/hesto/multi-auth/src/Traits/LogsoutGuard.php のトレイトをオーバーライドします )
    /**
     *
     * ログアウト後のリダイレクト先を「/admin/login」に設定する
     *
     */
    public function logoutToPath() {
        return '/admin/login';
    }
● /user/home , /admin/home など homeアクションの動作をカスタマイズする
デフォルトでは routes/user.php に
Route::get('/home', function () {
    $users[] = Auth::user();
    $users[] = Auth::guard()->user();
    $users[] = Auth::guard('admin')->user();
    return view('admin.home');
})->name('home');
という風にクロージャで /user/home へのルーティングが記述されています。 これらをコメントアウトで消してしまってroutes/web.php に記述していくと見通しがいいと思います。
● ログイン成功時にリクエストしたURLへジャンプするようにする
デフォルトではログイン成功時には /admin/home に全てリダイレクトされますが、次のようなケース
(ログインしていない状態で)
/admin/special(ログインが必要なページ)へアクセス
    ↓
/admin/login(ログイン画面へリダイレクト)
    ↓
ID, PASS 入力(ログイン成功)
    ↓
もともとアクセスしたページ(/admin/special)へリダイレクトしたい!
に対応するには次の箇所を書き換えます。
app/Http/Middleware/RedirectIfNotAdmin.php
	public function handle($request, Closure $next, $guard = 'admin')
	{
	    if (!Auth::guard($guard)->check()) {
		    \Session::put('RedirectIfNotAdmin_next_url', $request->fullUrl()); // ●追加● ログイン成功後の遷移先を保存
	        return redirect('admin/login');
	    }
	    return $next($request);
	}
app/Http/Controllers/AdminAuth/LoginController.php 以下の login()メソッドを丸々追加します。
    /**
     *
     * ログイン時のメソッド
     *
     */
    public function login(\Illuminate\Http\Request $request)
    {
        $this->validateLogin($request);

        if ($this->hasTooManyLoginAttempts($request)) {
            $this->fireLockoutEvent($request);

            return $this->sendLockoutResponse($request);
        }

        if ($this->attemptLogin($request)) {
            // ● 追加 ↓
            $RedirectIfNotAdmin_next_url = \Session::get('RedirectIfNotAdmin_next_url', null );
            \Session::forget('RedirectIfNotAdmin_next_url');

            if ( $RedirectIfNotAdmin_next_url ){
                return redirect( $RedirectIfNotAdmin_next_url );
            }
            // ● 追加 ↑
            return $this->sendLoginResponse($request);
        }

        $this->incrementLoginAttempts($request);

        return $this->sendFailedLoginResponse($request);
    }
● パスワードリマインダーのメールテキストを日本語に変更する(方法1)
・1. 独自のテンプレートを使用するように変更する
app/Notifications/UserResetPassword.php を以下のように変更
        return (new MailMessage)
            ->line('You are receiving this email because we received a password reset request for your account.')
            ->action('Reset Password', url('user/password/reset', $this->token))
            ->line('If you did not request a password reset, no further action is required.');
↓ テンプレート (resources/views/email/password_reset.blade.php) を使ってメール送信するように変更する
        return (new MailMessage)
            ->from($email_address, $email_name)
            ->view( 'email.password_reset' , [
                    'shop'      => $shop ,
                    'reset_url' => url('user/password/reset', [$shop->id, $this->token]) ,
            ]);
メール送信者はデフォルトで .env でしたいしたアドレスになるので、明示的に変更したい場合は ->from() メソッドで書き換えます
独自のパタメーターは配列で渡します。( 上の例では $shop を渡している)
'reset_url は適宜書き換えてください。
テンプレート例 (resources/views/email/password_reset.blade.php に保存)
<!DOCTYPE html>
<html>
<head>
<title></title>
</head>
    <body>
        <style>
        body{
            font-family:-apple-system,BlinkMacSystemFont,'Segoe UI',Roboto,Helvetica,Arial,sans-serif,'Apple Color Emoji','Segoe UI Emoji','Segoe UI Symbol';
            box-sizing:border-box;
        }
        </style>

        <div style="background-color:#f8fafc;color:#74787e;height:100%;line-height:1.4;margin:0;width:100%!important;word-break:break-word">
        <table width="100%" cellpadding="0" cellspacing="0" style="background-color:#f8fafc;margin:0;padding:0;width:100%">
        <tbody>
        <tr>
        <td align="center">
        <table width="100%" cellpadding="0" cellspacing="0" style="margin:0;padding:0;width:100%">
        <tbody>
        <tr>
        <td style="padding:25px 0;text-align:center">
        <a href="{{ url('/user/login', $shop->id) }}" style="color:#bbbfc3;font-size:19px;font-weight:bold;text-decoration:none" target="_blank" >
        {{ $shop->name }}
        </a>
        </td>
        </tr>
        <tr>
        <td width="100%" cellpadding="0" cellspacing="0" style="background-color:#ffffff;border-bottom:1px solid #edeff2;border-top:1px solid #edeff2;margin:0;padding:0;width:100%">
        <table align="center" width="570" cellpadding="0" cellspacing="0" style="background-color:#ffffff;margin:0 auto;padding:0;width:570px">
        <tbody>
        <tr>
        <td style="padding:35px">
        <p style="color:#3d4852;font-size:16px;line-height:1.5em;margin-top:0;text-align:left">「パスワード再設定」<wbr>ボタンを押してパスワードを再設定してください。</p>
        <table align="center" width="100%" cellpadding="0" cellspacing="0" style="margin:30px auto;padding:0;text-align:center;width:100%">
        <tbody>
        <tr>
        <td align="center">
        <table width="100%" border="0" cellpadding="0" cellspacing="0">
        <tbody>
        <tr>
        <td align="center">
        <table border="0" cellpadding="0" cellspacing="0">
        <tbody>
        <tr>
        <td>
        <a href="{{ $reset_url }}" style="border-radius:3px;color:#fff;display:inline-block;text-decoration:none;background-color:#3490dc;border-top:10px solid #3490dc;border-right:18px solid #3490dc;border-bottom:10px solid #3490dc;border-left:18px solid #3490dc" target="_blank" >パスワード再設定</a>
        </td>
        </tr>
        </tbody>
        </table>
        </td>
        </tr>
        </tbody>
        </table>
        </td>
        </tr>
        </tbody>
        </table>
        <p style="color:#3d4852;font-size:16px;line-height:1.5em;margin-top:0;text-align:left">もしこのメッセージに心当たりがない場合は破棄してください。</p>
        <table width="100%" cellpadding="0" cellspacing="0" style="border-top:1px solid #edeff2;margin-top:25px;padding-top:25px">
            <tbody>
                <tr>
                    <td>
                        <p style="color:#3d4852;line-height:1.5em;margin-top:0;text-align:left;font-size:12px">もし上の "パスワード再設定" ボタンを押してもうまく動作しない時はこちらのURLをブラウザ<wbr>に貼り付けてアクセスしてください。
                            <a href="{{ $reset_url }}" style="color:#3869d4" target="_blank">
                                {{ $reset_url }}
                            </a>
                        </p>
                    </td>
                </tr>
            </tbody>
        </table>
        </td>
        </tr>
        </tbody>
        </table>
        </td>
        </tr>
        <tr>
        <td>
        <table align="center" width="570" cellpadding="0" cellspacing="0" style="margin:0 auto;padding:0;text-align:center;width:570px">
            <tbody>
                <tr>
                    <td align="center" style="padding:35px">
                        copyright (c)2019 YOUR-SITE.COM
                    </td>
                </tr>
            </tbody>
        </table>
        </td>
        </tr>
        </tbody>
        </table>
        </td>
        </tr>
        </tbody>
        </table>
        </div>
    </body>
</html>
● パスワードリマインダーのメールテキストを日本語に変更する(方法2)
・1. モデルファイルにパスワードリマインダーのメソッドをオーバーライドする
モデルが User の場合は /app/User.php に以下を追加
    /**
     * パスワード再設定メールの送信
     *
     * @param  string  $token
     * @return void
     */
    public function sendPasswordResetNotification($token)
    {
        $this->notify( new \App\Notifications\UserResetPassword($token) );
    }
・2. メッセージを日本語化する
app/Notifications/UserResetPassword.php を以下のように変更
            // OFF  ->line('You are receiving this email because we received a password reset request for your account.')
            // OFF  ->action('Reset Password', url('user/password/reset', $this->token))
            // OFF  ->line('If you did not request a password reset, no further action is required.');
            ->line('「パスワード再設定」ボタンを押してパスワードを再設定してください。')
            ->action('パスワード再設定', url('user/password/reset', $this->token))
            ->line('もしこのメッセージに心当たりがない場合は破棄してください。');
・3. htmlメールのヘッダフッタを日本語に変更する
php artisan vendor:publish --tag=laravel-mail
php artisan vendor:publish --tag=laravel-notifications
コマンドを実行すると
resources/views/vendor/mail/(複数のテンプレートファイル)
resources/views/vendor/notifications/email.blade.php
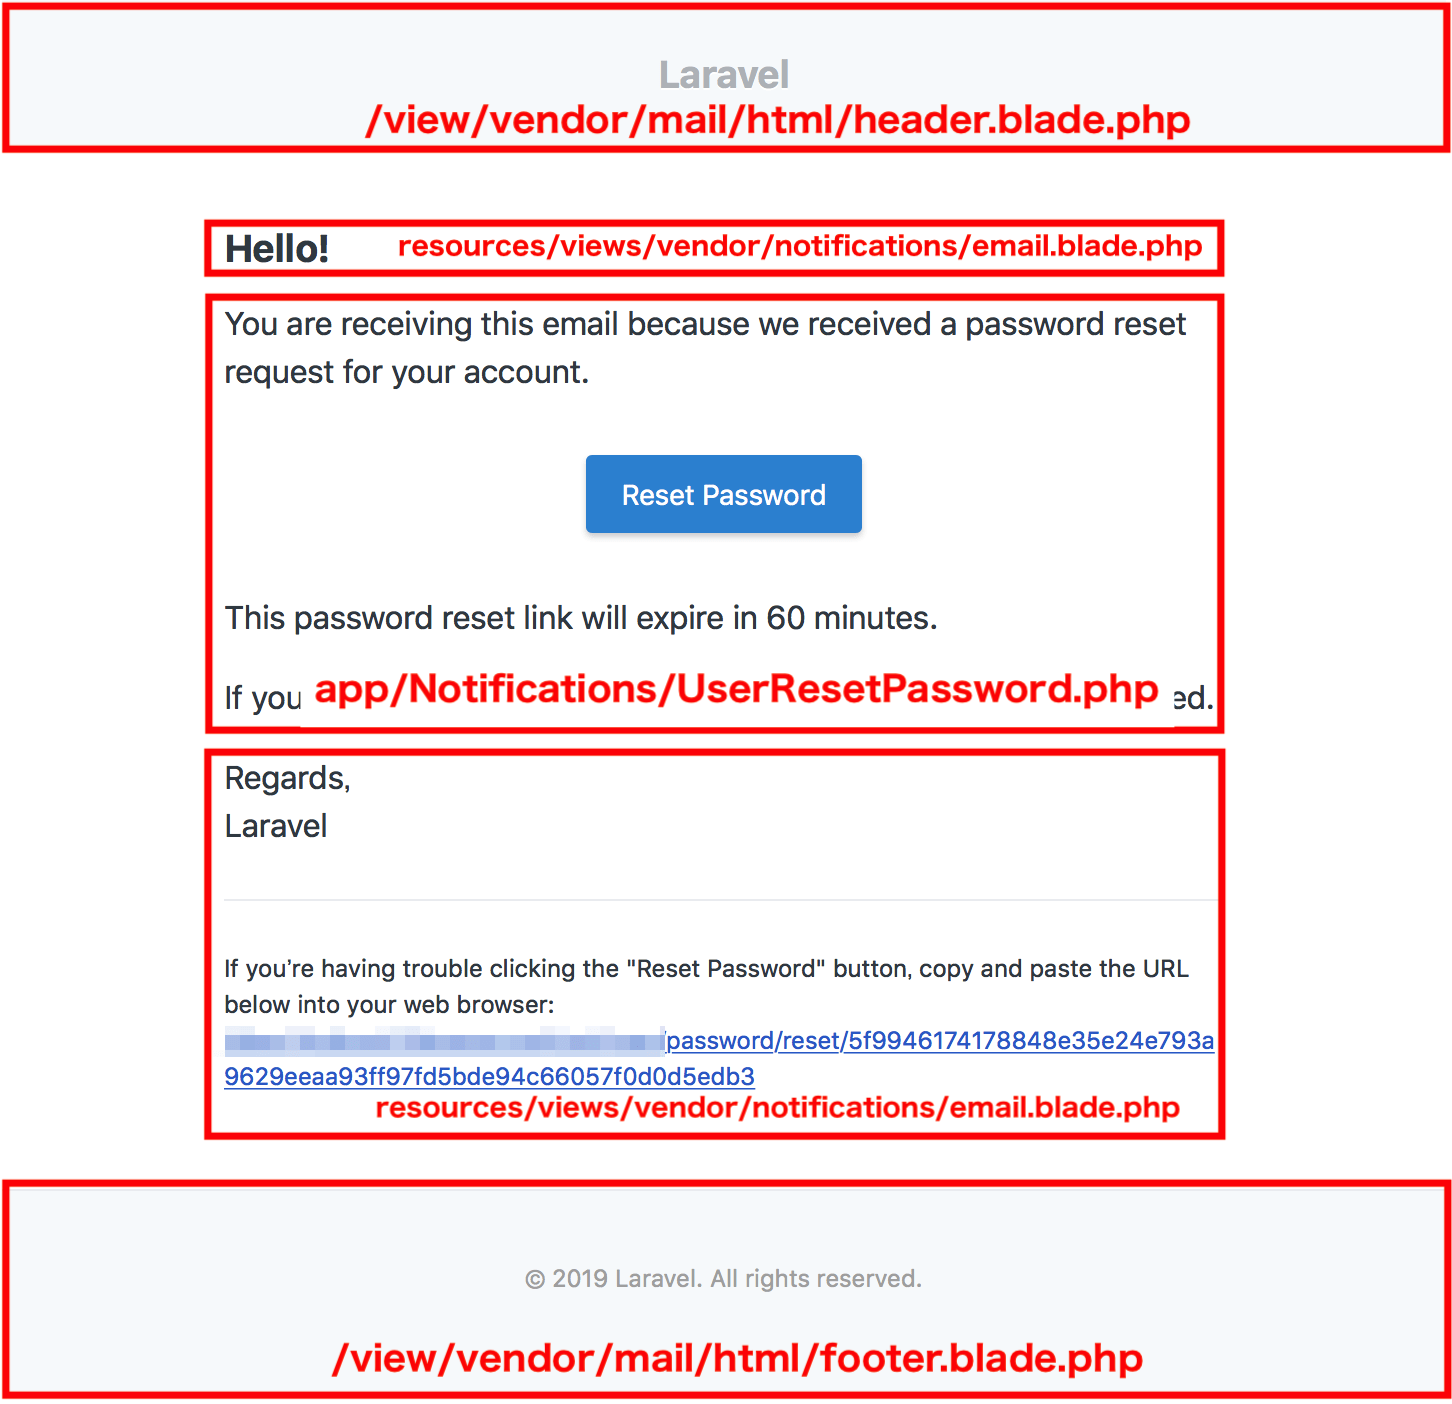
ファイルが自動生成されます。 変更する箇所は次の画像の通りです。

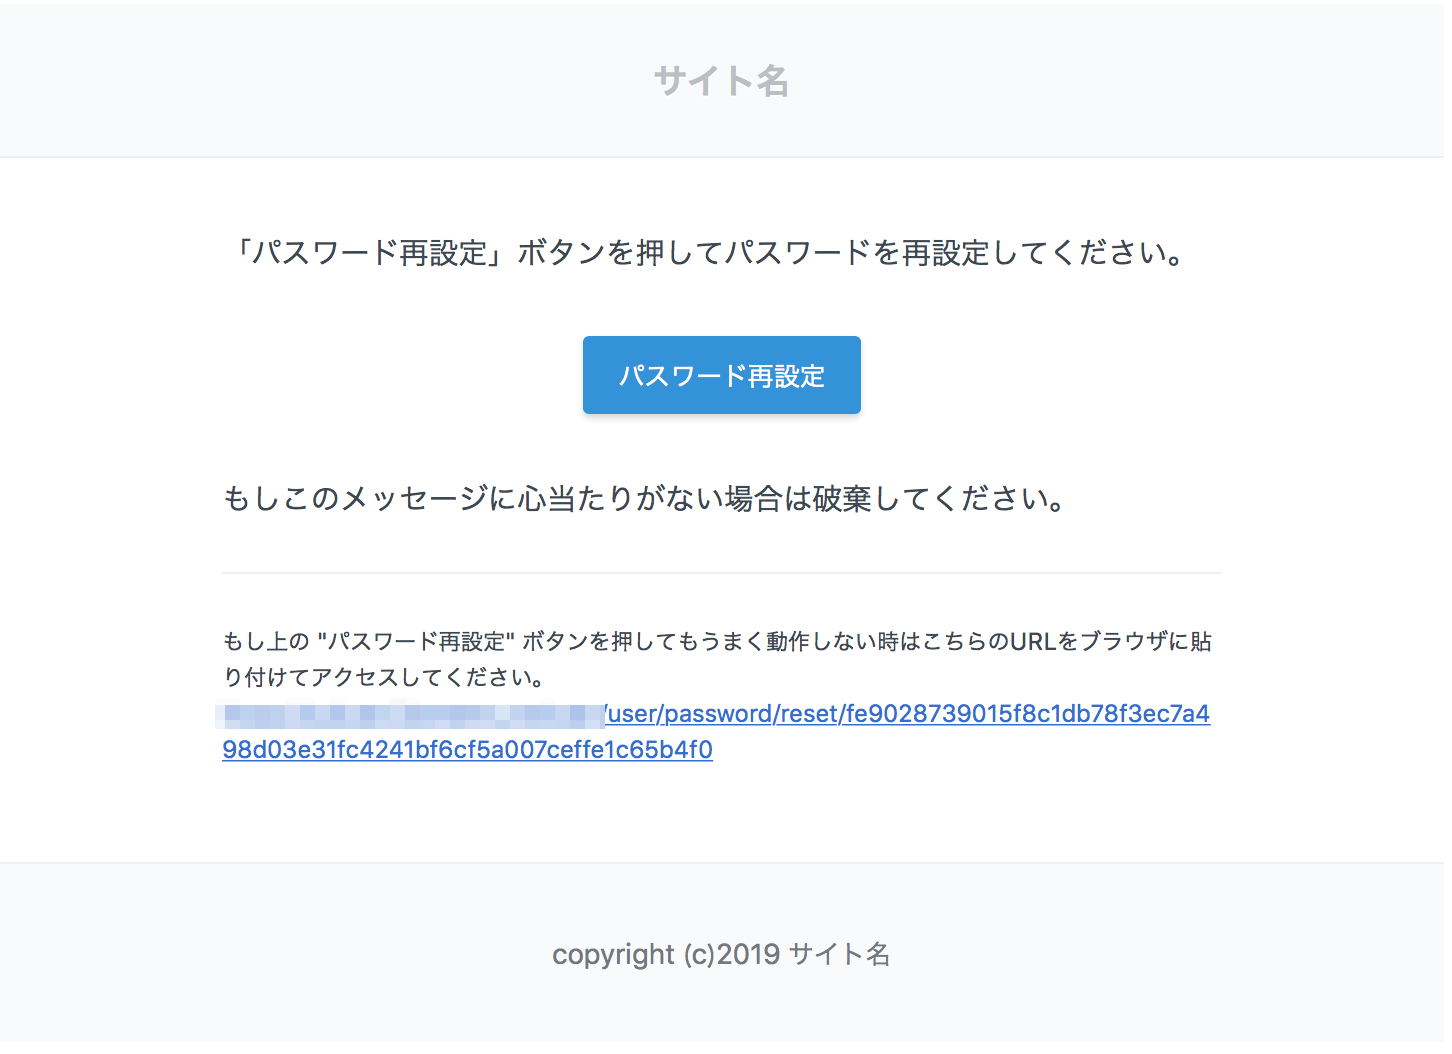
↓ すべて日本語化すると次のようになります

● ログインせずにログイン認証が必要なページを表示させようとした時のリダイレクト先を変更する
app/Http/Middleware/RedirectIfNotUser.php
	public function handle($request, Closure $next, $guard = 'user')
	{
	    if (!Auth::guard($guard)->check()) {
	        return redirect('user/login');  // ここを書き換えます
	    }